The Official Supply And Demand Trading Guide
--------------------------------------------------------------
လြန္ခဲ့ေသာ ႏွစ္ အနည္းငယ္ခန္႕က အစျပဳၿပီးေတာ့ ကၽြန္ေတာ္တို႕ forex traders
ေတြ အၾကားမွာ က်ယ္က်ယ္ျပန္႕ျပန္႕ ေရပန္းစားလာတဲ႕ Trading method တစ္ခုကို
မိတ္ဆက္ေပးခ်င္ပါတယ္။ အဲ႕ဒါကေတာ့ Supply and demand trading System ပါပဲ။
Supply and demand trading ဆိုတာကို ယခုလို ရွင္းျပထားပါတယ္။
ကၽြန္ေတာ္တို႕ ေစ်းကြက္ တစ္ခုထဲမွာ ဘယ္ေစ်းႏံႈးေတြမွာ Strong advance or
decline ျဖစ္ေပၚလာသလဲ ဆိုတဲ႕ အခ်က္အလက္ ေတြကို ရွာေဖြၿပီး အဲ႕ဒီ areas
ေတြကို Supply and demand zones ေတြအျဖင့္ rectangles ေတြနဲ႕ ေရးဆြဲ
ေဖာ္ျပႏိုင္ပါတယ္။ အဲ႕ဒီ Zones ေတြကို အသံုးျပဳၿပီး trading လုပ္တဲ႕ method
ဆိုတာကေတာ့ Supply and demand trading method ပါပဲ။
ေစ်းႏံႈးတစ္ခုမွာ Trader ေတြဟာ Strong advance တစ္ခု ျဖစ္ေပၚေစတယ္ဆိုရင္ ဒီ
point ဟာ Demand Zone လို႕ ေခၚဆိုႏိုင္ပါတယ္။ ။ အျပန္အလွန္အား ျဖင့္ Sharp
decline တစ္ခု ျဖစ္ေပၚေစတယ္ဆိုရင္ေတာ့ ဒါဟာ Supply Zone ပဲ ျဖစ္ပါတယ္။ New
supply and demand zone trading system ရဲ႕ယူဆပံု မေျပာခင္မွာ Supply and
demand Zone Old trading System ရဲ႕ယူဆပံုေလး အရင္ေျပာခ်င္ပါတယ္။ ဒီေနရာမွာ
ေသခ်ာနားလည္ေအာင္ ဖတ္ေပးပါလို႕ ေျပာပါရေစ။ ဘာျဖစ္လို႕လဲ ဆိုေတာ့
အေဟာင္းနဲ႕ အသစ္ဟာ ယူဆပံုဟာ အေတာ္မ်ားမ်ား ကြဲျပားသြားလို႕ပဲ ျဖစ္ပါတယ္။
ကဲ အေဟာင္းကေလးကို အရင္စလိုက္ၾကရေအာင္…
tongue emoticon
ေစ်းကြက္ထဲမွာ price ဟာ sharp တစ္ခုလို move up or down ျဖစ္ေပၚလာတဲ႕
အခ်ိန္မွာ banks/hedge funds တို႕ကဲ႕သို႕ large institutions ေတြဟာ
ေစ်းကြက္မွာ သူတို႕လိုခ်င္တဲ႕ trades ပမာဏ ျပည့္၀ဖို႕ အတြက္
မျဖစ္ႏိုင္ခဲ႕ပါဘူး။ ဒါကို သူတို႕ ဟာ အဲ႕ဒီေနရာ zone မွာ price
ေနာက္တစ္ႀကိမ္ ျပန္လာတဲ႕ အခါမွာ သူတို႕ရဲ႕ order ေတြကို ျပည့္ဖို႕အတြက္
pending orders ေတြကို ခ်န္ထားခဲ႕ၾကေလ႕ ရွိတယ္လို႕ ဆိုပါတယ္။ ဒါဟာ Supply
and demand trading ျဖစ္ေပၚလာေစတဲ႕ အဓိက အေၾကာင္းအရာပဲ ျဖစ္ခဲ႕တယ္လို႕
ဆိုပါတယ္။
ကၽြန္ေတာ္တို႕ Supply and demand trading အေၾကာင္း
ေကာင္းေကာင္းမသိေသးတဲ႕ Trader သစ္ တစ္ေယာက္ဟာ ကၽြန္ေတာ္ အထက္ပါ ရွင္းျပတဲ႕
theory (အေဟာင္း ယူဆခ်က္) ယူဆခ်က္ ကို ေကာင္းေကာင္း သိခ်င္မွ
သိခဲ႕ပါလိမ့္မယ္။ (ေနာက္ပိုင္းမွာ ယူဆခ်က္ေတြ ကြဲလြဲလာတဲ႕ အတြက္
ျဖစ္ပါတယ္။) ထားပါေတာ့။ ကၽြန္ေတာ္တို႕ ဆက္ေျပာပါမယ္။ ခုနက large
institutions ေတြ pending orders ေတြကို ခ်န္ထားခဲ႕တယ္ဆိုတဲ႕ ယူဆခ်က္ပါ။
ဒါဟာ အဓိက ျပသနာ တစ္ခု ျဖစ္ပါတယ္။ ဘာေၾကာင့္လဲ ဆိုေတာ့ ကၽြန္ေတာ္တို႕
အထက္ပါ Theory ဟာ forex market အမွန္တကယ္ အလုပ္လုပ္ပံုနဲ႕ လံုး၀ကို
မွားယြင္းေနတာပါပဲ။ 90% ေသာ supply and demand traders ေတြ အားလံုးဟာ
Supply and Demand Zones ေတြမွာ Trade လုပ္ၾကပါတယ္။ large institutions ေတြ
ဟာ pending orders ေတြကို အဲ႕ဒီ Zones ေတြမွာ ခ်န္ထားခဲ႕တယ္ ဆိုတဲ႕ အထက္ပါ
idea နဲ႕ market ေတြ returns ျပန္ျဖစ္လာတဲ႕အခါမွာ ေပါ့။ ဒါဟာ လံုး၀ကို
မွားယြင္းေနတဲ႕ ယူဆခ်က္လို႕ ဆိုပါတယ္။ ဘယ္လို ထပ္ရွင္းထားသလဲ ဆိုေတာ့
Institutions ေတြဟာ သူတို႕ ႏွစ္သက္တဲ႕ ေစ်းႏံႈး တစ္ခုမွာ pending orders
ေတြ ထားခဲ႕ၾကတယ္ ဆိုပါေတာ့၊ ဒီ order ေတြ ကို price ထိသြားတဲ႕ အခ်ိန္မွာ
price ဟာ ဘယ္ကိုမွ ေရႊ႕ရွားမသြားပါဘူး။ ဘာေၾကာင့္လဲ ဆိုေတာ့ pending orders
ေတြဟာ market price ကို ေျပာင္းလဲေစႏိုင္တဲ႕ အေၾကာင္းအခ်က္ မဟုတ္လို႕ပါပဲ။
Price ကို ေရႊ႕ရွားေစတာကေတာ့ market order ေတြသာလွ်င္ market price ကို
ေျပာင္းလဲ ေစတာပဲ ျဖစ္ပါတယ္။
ဒီ အေၾကာင္းအရာေတြ ဘာေၾကာင့္ ဘယ္လို ဆိုတာကို နားလည္ႏိုင္ဖို႕ အတြက္ ကၽြန္ေတာ္တို႕ Liquidity အေၾကာင္းကို ဆက္ၿပီးေလ့လာပါမယ္။
What Is Liquidity ?
Liquidity ဆိုတာကေတာ့ ေငြျဖစ္လြယ္မႈကို ေခၚဆိုတာပါ။ ဆိုလိုတာကေတာ့
ကၽြန္ေတာ္တို႕ market ထဲမွာ တစ္စံုတစ္ခုကို ေရာင္းလိုက္မယ္၊ ဒါမွမဟုတ္
ေရာင္းခ်င္တယ္ ဆိုတဲ႕အခါမွာ ၀ယ္သူ အဆင္သင့္ရွိေနတဲ႕ သေဘာပါ။ ထို႕ အတူ
တစ္စံုတစ္ခုကို ၀ယ္ခ်င္တယ္ ဆိုရင္လည္း အရန္သင့္ ေရာင္းမယ့္သူ ရွိေနတာပဲ
ျဖစ္ပါတယ္။ liquidity ရွိေနတယ္ ဆိုရင္ ေရာင္းသူ၊ ၀ယ္သူ ေက်နပ္ေနၾကတဲ႕
အတြက္ ေစ်းႏံႈး price ဟာ ေျပာင္းလဲ မႈ မရွိပါဘူး။ ဒါေၾကာင့္မို႕ chart
ထဲမွာ ေရႊ႕ရွားမႈ မရွိပါဘူး။ ဒါေၾကာင့္မို႕ liquidity ဆိုတာက ကၽြန္ေတာ္တို႕
ႀကီးမားတဲ႕ ေစ်းႏံႈး အေျပာင္းအလဲမရွိပဲ အ၀ယ္ (သို႕မဟုတ္) အေရာင္း အခ်ိဳ႕
ျပဳလုပ္ႏိုင္ တဲ႕ စြမ္းရည္ပဲ လို႕ ဆိုရမွာပဲ ျဖစ္ပါတယ္။ ေစ်းႏံႈး
ေရႊ႕ရွားမႈ မရွိရင္ liquidity ရွိေနလို႕ျဖစ္ပါတယ္။ ဆန္႕က်င္ဘက္အားျဖင့္
ဘယ္အခ်ိန္မွာပဲ ျဖစ္ျဖစ္ market မွာ price ကို ေရႊ႕ရွားေနတာကို
ျမင္ေတြ႕ရတယ္ဆိုရင္ေတာ့ ေငြျဖစ္လြယ္မႈ liquidity ကင္းမဲ႕ေနတာ ျဖစ္ပါတယ္။
ဒီအေျခအေနဟာ ေရာင္းသူထက္ ၀ယ္သူမ်ားတဲ႕ အေျခအေနေတြ၊ ၀ယ္သူထက္ ေရာင္းသူ
မ်ားေနတဲ႕ အေျခအေန ေတြေၾကာင့္ပဲ ျဖစ္ပါတယ္။
Trader တစ္ေယာက္ဟာ market
order တစ္ခုကို ေစ်းကြက္ထဲကို ၀င္လိုက္တာဟာ liquidity ကို ေလ်ာ့နည္း
ေစေအာင္ လုပ္လိုက္တာပဲ ျဖစ္ပါတယ္။ တနည္းအားျဖင့္ ဆိုရေသာ္ liquidity ကို
ဖယ္ရွားေနတာပါ။ ဘာေၾကာင့္လည္းဆိုေတာ့ market order ကို ၀င္လိုက္တဲ႕ trader
ဟာ သူ႕ရဲ႕ ေရာင္းဖို႕ သို႕မဟုတ္ ၀ယ္ဖို႕ ေတာင္းဆိုခ်က္ကို ရရွိဖို႕အတြက္
အျခားတဖက္မွာ ရွိေနတဲ႕ အျခားသူ တစ္ေယာက္ရဲ႕ Pending order နဲ႕ match
ျဖစ္ဖို႕လိုသလို ျဖစ္လည္း ျဖစ္သြားလို႕ပါပဲ။ ဆိုလိုတာက market order
ဖြင့္လိုက္တဲ႕ အခါမွာ broker ဟာ ဖြင့္ေစ်းနဲ႕ တူတဲ႕ pending order ေတြကို
ရွာပါတယ္။ ေတြ႕ရင္ match ျဖစ္တဲ႕ အတြက္ ေစ်းမလႈပ္ပါ။ သို႕ေသာ္လည္း
အဲ႕ဒီေစ်းမွာ ထား ထားတဲ႕ pending order ေလ်ာ့နည္းသြားတဲ႕ အတြက္ liquidity
ေလ်ာ့နည္းသြားတာ ျဖစ္ပါတယ္။ အကယ္၍ market order ဖြင့္လိုက္တဲ႕ အခါမွာ
broker ဟာ ဖြင့္ေစ်းနဲ႕ တူတဲ႕ pending order ကို ရွာမေတြ႕တဲ႕ အခါမွာ ေစ်း
အနီးစပ္ဆံုး ရွိေနတဲ႕ pending order ကို ရွာပါတယ္။ ၿပီးေတာ့ အဲ႕ဒီ pending
order နဲ႕ match လုပ္ပါတယ္။ အဲ႕ဒီအခ်ိန္မွာ market order ထားတဲ႕သူဟာ
သူေတာင္းဆိုတဲ႕ ေစ်းနဲ႕ မရပဲ အနည္းငယ္ေျပာင္းလဲ သြားႏိုင္တဲ႕ ေစ်းနဲ႕သာ
ရရွိေတာ့တာျဖစ္ပါတယ္။ ဒါဟာ liquidity မရွိေတာ့ပဲ ေစ်းကြက္ကို လႈပ္ေစခဲ႕တဲ႕
အေျခခံ အေၾကာင္းအရာပဲ ျဖစ္ပါတယ္။
အကယ္၍မ်ား market order ရဲ႕ size ဟာ
ဆန္႕က်င္ဘက္ pending order ထက္ကို ပိုႀကီးေနတဲ႕ အေျခအေန ဆိုရင္ ဘာျဖစ္မလဲ
ဆိုေတာ့ market order ရဲ႕ အစိတ္အပိုင္း အခ်ိဳ႕ ဟာ အရင္ ျပည့္၀သြားပါမယ္။
ဒီအခ်ိန္မွာ မျပည့္ေသးတဲ႕ order ေတြဟာ rest လုပ္ပါတယ္။ ဒါေၾကာင့္မို႕လို႕
market ဟာ အျခားမတူညီတဲ႕ ေစ်းႏံႈးကို ေရႊ႕ရွားသြားရပါမယ္။ ထပ္တိုး pending
orders ရွာေဖြဖို႕ အတြက္ပဲ ျဖစ္ပါတယ္။ ဒါဟာ က်န္ရွီေနေသးတဲ႕ market order
ေတြကို ထပ္မံၿပီး ျဖည့္နိုင္ဖို႕အတြက္ပဲ ျဖစ္ပါတယ္။ အေျခခံအားျဖင့္
ဘာအဓိပၸါယ္ သက္ေရာက္မႈ ရွိသလဲ ဆိုေတာ့ pending orders ေတြဟာ market ထဲကို
liquidity ကိုေပါင္းထည့္ေပးပါတယ္။ ဘာေၾကာင့္လဲဆိုေတာ့ သူတို႕ဟာ သူတို႕နဲ႕
matched ျဖစ္လာမယ့္ market orders ေတြထဲက orders ေတြ ပဲ ျဖစ္တဲ႕
အတြက္ေၾကာင့္ပဲ ျဖစ္ပါတယ္။
ကၽြန္ေတာ္တို႕ လိုမ်ိဳး retail traders
ေတြဟာ market price ကို သက္ေရာက္မႈ၊ လႈပ္ရွားမႈ ရွိေအာင္ လံုေလာက္တဲ႕
ႀကီးမားတဲ႕ lot size တစ္ခုကို trade လုပ္ႏိုင္ျခင္း မရွိပါဘူး။
ကၽြန္ေတာ္တို႕ရဲ႕ placing and exiting trades ေတြဟာလည္း ဒီလိုေစ်းကြက္
လႈပ္ရွားမႈ မ်ိဳးျဖစ္ေအာင္ သီးျခား စြမ္းေဆာင္ႏိုင္လိမ့္မယ္ လို႕ မေတြးေတာ
မိသလို ထင္လည္း မထင္မိပါဘူး။ သို႕ေသာ္လည္း ႀကီးမားတဲ႕ large institution
ေတြ ရဲ႕ ဒီလိုမ်ိဳး Placing trades ေတြပဲ ျဖစ္ျဖစ္၊ Exiting trades ေတြပဲ
ျဖစ္ျဖစ္ ရွိေနတာကေတာ့ liquidity ကို ေလ်ာ့က် ကြယ္ေပ်ာက္ေစၿပီး ေစ်းကြက္ကို
လႈပ္ရွားေစတာကေတာ့ အမွန္ပဲ ျဖစ္ေနပါတယ္။ ဘာေၾကာင့္လဲဆိုေတာ့ သူတို႕ ထားတဲ႕
trades ေတြဟာ သိပ္ႀကီးမားတာေၾကာင့္ ျဖစ္ပါတယ္။ professional trader
တစ္ေယာက္ ရဲ႕ ပထမအဆင့္ ပန္းတိုင္ေတြ ထဲက တစ္ခုုဟာ ေစ်းကြက္ထဲ
ရွိျဖစ္ႏိုင္တဲ႕ market price အေပၚမွာ အနည္းငယ္ေသာ အက်ိဳးသက္ေရာက္မႈ
နဲ႕ပဲျဖစ္ျဖစ္ trade ၀င္ႏိုင္တဲ႕ ေနရာ တစ္ခု ရရွိႏိုင္ဖို႕ပဲျဖစ္ပါတယ္။
ဒီအဓိပၸါယ္ကေတာ့ ေစ်းကြက္ထဲမွာ ရွာေဖြေနတဲ႕ ေနရာ ျဖစ္တဲ႕ အနည္းငယ္ေသာ
liquidity exist ျဖစ္မယ့္ ေနရာပဲ ျဖစ္ပါတယ္။ liquidity နဲ႕ အတူ market
order , pending order ေတြရဲ႕ အက်ိဳးသက္ေရာက္မႈေတြ အေၾကာင္းကို အေတာ္အသင့္
တီးမိေခါက္မိၿပီးလို႕ ထင္ပါတယ္။ ကၽြန္ေတာ္တို႕ supply and demand zone
အေၾကာင္းကို ျပန္သြားပါမယ္။
Why Would The Institutions Wait To Get Their Order Placed ?
The Institutions ေတြဟာ သူတို႕ရဲ႕ order ေတြကို ထား ႏိုင္ဖို႕ အတြက္ကို
ဘာေၾကာင့္ ေစာင့္ေနၾကပါသလဲ။ pending order အျဖင့္ေပါ့။ စိတ္၀င္စားစရာ
ေကာင္းပါတယ္။ ဒီ ကၽြန္ေတာ္တို႕ supply and demand zone ရဲ႕ new trading
system ရဲ႕ စည္းမ်ဥ္းစည္းကမ္းေတြကို ကၽြန္ေတာ္တို႕ မရရွိခင္မွာပဲ ကၽြန္ေတာ္
စဥ္းစားခဲ႕ပါတယ္။ ကၽြန္ေတာ္တို႕ဟာ ကၽြန္ေတာ္တို႕ စိတ္ကူးေတြေပၚက အခ်ိဳ႕ေသာ
ယခင္ယူဆခဲ႕ေသာ အယူအဆ ေပါ့ေပါ့ပါးပါး အရာေတြကို ပယ္ေဖ်ာက္ပစ္ရပါမယ္။ ဘယ္လို
အရာေတြလည္း ဆိုေတာ့ institutions ေတြဟာ ေစ်းကြက္ကြက္ထဲမွာ Supply and
demand zones ေတြမွာ သူတို႕ရဲ႕ pending orders ေတြကို Price ျပန္လာရင္
ထိႏိုင္ဖို႕ အတြက္ ထားခဲ႕တယ္ဆိုတဲ႕ အထင္အျမင္ေတြကိုပဲ ျဖစ္ပါတယ္။ Zone
တစ္ခုမွာ အေရာင္း သို႕မဟုတ္ အ၀ယ္ ေအာ္ဒါ အေဟာင္းေတြ အမွန္တကယ္
ရွိေနတက္တယ္ဆိုတဲ႕ ထင္ျမင္ခ်က္မ်ိဳး ကၽြန္ေတာ္တို႕ ရွိေနလို႕ မရပါဘူး။
အဓိပၸါယ္ ကေတာ့ supply zone တစ္ခု ဟာ သံုးႏွစ္ ရွိခဲ႕ၿပီး၊ အဲ႕ဒီ အတိတ္
သံုးႏွစ္ အတြင္း market ဟာ အဲ႕ဒီကို ျပန္လွည့္တာလည္း မရွိခဲဘူး ဆိုရင္
ဒါကို အမွန္တကယ္ စိတ္ထဲမွာ သိေနတာက banks ေတြဟာ အဲ႕ဒီ zone မွာ အေရာင္း
pending order တစ္ခု ထားရွိေနမွာလား ဆိုတာကိုေပါ့။ အထက္ပါအတိုင္း
ဆိုပါေတာ့ bank ေတြဟာ ေစ်းကြက္ ဘယ္သြားမလဲဆိုတာကို သိေနသလိုႀကီး
ျဖစ္ေနမွာေပါ့။ ဘယ္လို လုပ္ သိႏိုင္မွာပါလဲ။ ဒါကို သိဖို႕ နည္းလမ္း
မရွိပါဘူး။ အကယ္၍ market ဟာ zone ကို ျပန္လာမယ္ ျပန္မလာဘူး ဆိုတာကိုေပါ့။
ဒါေၾကာင့္ ပထမေနရာမွာ order တစ္ခုကို ဘာေၾကာင့္ သူတို႕ ထားမွာပါ ပါလဲ။
ေသေသခ်ာခ်ာ စဥ္းစားေတြးေခၚၾကည့္ႏိုင္ပါတယ္။
Time Spent Away From Zone
Supply and demand traders ေတြ အတိုင္း အတာ တစ္ခုအထိ အသံုးျပဳတဲ႕ ယခင္က
ခ်မွတ္ခဲ႕တဲ႕ စည္းကမ္း တစ္ခုကေတာ့ Zone တစ္ခုဟာ Zone ကေန ခပ္ေ၀းေ၀းကို
အခ်ိန္ယူၾကာၾကာ ထြက္သြားတဲ႕ အခ်ိန္ ပိုၾကာရင္ ပိုၿပီး ျဖစ္ႏိုင္ေျခ
ျမင့္ျမင့္မားမား ေအာင္ျမင္ေအာင္ အလုပ္လုပ္ႏိုင္ပါတယ္ ဆိုထား တာပါပဲ။
ေနာက္ထပ္ၿပီးေတာ့ သိရသေလာက္ကေတာ့ supply and demand teachers ေတြရဲ႕ အဆိုအရ
supply or demand zone ကေန ေ၀းေ၀း နဲ႕ ၾကာၾကာထြက္သြားၿပီး ျပန္ေရာက္လာတဲ႕
market ဟာ ျပန္လွည့္လာႏိုင္ဖို႕ ပိုမို ေကာင္းမြန္တဲ႕ အခြင့္အေရး ရွိတဲ႕
market ျဖစ္တယ္လို႕ ဆိုပါတယ္။
ဒီေျပာၾကားခ်က္ေတြကို ထပ္ၿပီးေတာ့ အားနည္းခ်က္ေတြကို ေတြးၾကည့္ရေအာင္
ေရာင္းဖို႕ အတြက္ပဲ ျဖစ္ျဖစ္ ၀ယ္ဖို႕ အတြက္ပဲ ျဖစ္ျဖစ္ pending order
တစ္ခုကို bank ဟာ ထားထားမယ္ဆိုပါေတာ့။ ဘယ္အခ်ိန္မွာ supply or demand zone
ကို ေရာက္လာဖုိ႕ ျပန္လွည့္လာဖို႕ ေစ်းကြက္ဟာ ေမွ်ာ္လင့္ထားသလို ျဖစ္လာဖို႕
အတြက္ သူတို႕ ဟာ အမွန္တကယ္ အခ်ိန္ၾကာၾကာ ဘယ္ေလာက္ထိ ေစာင့္ႏိုင္ၾကမွာပါလဲ။
Chart 1 မွာ ၾကည့္ပါ။

ဒီမွာ ကၽြန္ေတာ္တို႕
ႏွိဳင္းယွဥ္ျပထားတာကေတာ့ Old supply and demand zones ေတြကို အျပာေရာင္
ျခယ္ျပထားပါတယ္။ ေနာက္ မၾကာေသးမွီက ျဖစ္ခဲ႕တဲ႕ zones ေတြကိုေတာ့
လိေမၼာ္ေရာင္ ျခယ္ျပထားပါတယ္။ ဒါဟာ အလြယ္တကူ ျမင္ေတြ႕ႏိုင္ေစတာကေတာ့
trading zones ေတြဟာ မၾကာေသးမွီက ဖန္တီးထားတာ ျဖစ္ပါက ၾကာျမင့္စြာက
ျဖစ္ေပၚခဲ႕တဲ႕ trading zones ေတြထက္ကို အျမတ္ ရႏိုင္ေျခ ပိုမ်ားတာ အလြယ္တကူ
ေတြျမင္ႏိုင္ပါတယ္။ ေဖာ္ျပပါ ပံုအရ ကၽြန္ေတာ္တို႕ Trade လုပ္ခဲ႕မယ္ ဆိုရင္
recent zones 6ခု ရဲ႕ အေျဖဟာ ေအာင္ျမင္တဲ့ trade အျဖစ္ ရလဒ္
ထြက္ေပၚလာခဲ႕ပါတယ္။ သို႕ေသာ္လည္း older zones ေတြမွာ ဆိုရင္ ေတာ့ သူတို႕
ထဲက တစ္ခုသာလွ်င္ အျမတ္ရေအာင္ ဖန္တီးႏိုင္မွာ ျဖစ္ပါတယ္။ အထက္ပါ ဥပမာက
ကၽြန္ေတာ္တို႕ ကို supply or demand zone ကို အျမန္ျပန္လွည့္လာတဲ႕
ေစ်းကြက္က successful trade တစ္ခု ရရွိဖို႕အတြက္ ပိုမိုေကာင္းမြန္တဲ႕
အခြင္အေရး ရွိေနတယ္ဆိုတာကို သက္ေသျပလိုက္တာပါပဲ။ Older zone ေတြကို မၾကာခဏ
တြက္ထုတ္ဖို႕အတြက္ ဂရုမစိုက္ပါနဲ႕လို႕ ဆိုပါတယ္။ ဒါေၾကာင့္မို႕လို႕
ကၽြန္ေတာ္တို႕ အေနနဲ႕ trade ေတြကို သိပ္ မၾကာေသး ခင္က create လုပ္ခဲ႕တဲ႕
zone ထဲမွာ ထားခဲ႕မယ္ဆိုရင္ ပိုၿပီး ေအာင္ျမင္ဖို႕ အတြက္
ျဖစ္ေကာင္းပါတယ္လို႕ ဆိုႏိုင္ပါတယ္။
The Strength Of The Move Away
Old method မွာ Supply and demand trading လုပ္ဖို႕ အတြက္ အေျခခံက်တဲ႕
စည္းမ်ဥ္း တစ္ခုကေတာ့ “ Zone တစ္ခုက အေ၀းကို ထြက္သြားေသာ Stronger ဟာ
ပိုမို ျမင့္မားတဲ႕ အခြင့္အေရး ရွိပါတယ္။ ေနာက္ဆံုး ျပန္လာတဲ႕ အခါမွာ
ခပ္ေ၀းေ၀း ကို သြားနိုင္တယ္။ အဲ႕ဒီအေျခအေနမ်ိဳးဟာ market ဟာ strong move
away ရွိတယ္ေပါ့။ အဲ႕သလိုဆိုခဲ႕ျပန္ပါတယ္။ ဒါေပမယ့္ ကၽြန္ေတာ္တို႕ အေနနဲ႕
ကၽြန္ေတာ္တို ့ရဲ႕ charts ေပၚမွာ Zone တစ္ခုကို သတ္မွတ္ထားမယ္၊ အဲ႕ဒီ zone က
strong move away တစ္ခု ရွိေနမယ္ ဆိုရင္ ဘယ္လို ေအာင္ျမင္မယ့္ trade
တစ္ခု ကၽြန္ေတာ္တို႕ အတြက္ ရလဒ္ ဘယ္လို ျဖစ္လာမွာပါလဲ၊ ဘာေၾကာင့္လဲ၊
ဘယ္လို ႀကီးမားတဲ႕ ေရႊ႕ရွားမႈ တစ္ခုကို zone ကေနၿပီးေတာ့ ဖန္တီးၿပီး
ေထာက္ပံ့မလဲ ဆိုတာကိုပါပဲ။ စဥ္းစားစရာပါ။ နည္းနည္းေတာ့ အဓိပၸါယ္ မရွိသလို
ျဖစ္ေနတာပါ။ ေနာက္ၿပီး အကယ္၍ ကၽြန္ေတာ္တို႕ အေနနဲက စည္းမ်ဥ္းေတြအရ multiple
bearish large range candles ေတြပါ၀င္တဲ႕ huge drop တစ္ခု ရွိတဲ႕ supply
zone တစ္ခုကို သတ္မွတ္ခဲ႕တယ္ဆိုရင္ zone မွာ ေအာင္ျမင္ေအာင္
အလုပ္လုပ္ႏိုင္တဲ႕ အစစ္အမွန္ ျမင့္မားတဲ႕ အခြင့္အေရး တစ္ခု ရွိတယ္လို႕
ဆိုပါတယ္။ အကယ္၍ ကၽြန္ေတာ္တို႕ အေနနဲ႕ ဆံုးျဖတ္ခ်က္ ခ်ခဲ႕ရင္ အဲ႕ဒါကို ပဲ
trade ရမယ္လို႕ ဆိုခဲ႕ပါတယ္။ ဒါေပမယ့္ supply and demand zone ရဲ႕
ျဖစ္ႏိုင္ေခ်ကေတာ့ Strong ျဖစ္ျဖစ္ မျဖစ္ျဖစ္ zone ရဲ႕ အျပင္ဘက္ကို
ေရႊ႕ရွားသြားတာနဲ႕ ဘယ္လို အခ်က္မ်ား ျပည့္စံုဖို႕ မလိုပဲ successful trade
တစ္ခု ေပးေနႏိုင္တယ္ ဆိုတာကိုပါပဲ။
Chart 2 ကို ၾကည့္ပါ။
Supply
and demand ဆရာေတြက အမ်ားအားျဖင့္ သင္ျပေပးလိုက္တာကေတာ့ ဒါဟာ strong area
ျဖစ္ပါတယ္။ ကၽြန္ေတာ္တို႕ အေနနဲ႕ market ဟာ ဒါကို မရပ္ပဲနဲ႕ေတာင္မွ
ကတိဖ်က္တာကို ကို ျမင္ႏိုင္ပါတယ္။ ေနာက္ point အေပၚမွာ ကၽြန္ေတာ္တို႕
မွတ္မိေစပါမယ္။
How To Determine Which Zones Are Stronger Than Others
ဘယ္ Zones ေတြဟာ အျခားဟာေတြထက္ကို Stronger ျဖစ္တယ္ဆိုတာကို ဘယ္လို သတ္မွတ္မလဲ?
ယခု ကၽြန္ေတာ္တို႕ဟာ Supply and demand zone ကေနၿပီးေတာ့ ႀကီးမားတဲ႕
ေရႊ႕ရွားမႈ တစ္ခုဟာ ျဖစ္ေပၚလာတယ္ ဆိုပါစို႕။ အဲ႕ဒီအခါမွာ အျမတ္ရမယ္
မရဘူးဆိုတဲ႕ ျဖစ္ႏိုင္ေခ် တစ္ခုကို တြက္ထုတ္ႏိုင္တယ္ လို႕ ယခင္က
သတ္မွတ္ခဲ႕ပါတယ္။ ဒါေပမယ့္ ယခုအေျခအေနမွာေတာ့ ဒီအျဖစ္အပ်က္မ်ိဳး အေပၚမွာ
အျခား အက်ိဳးသက္ေရာက္ နိုင္မႈ တစ္စံုတစ္ရာ မရွိဘူး ဆိုတာကို သိခဲ႕ရၿပီး
ျဖစ္ပါတယ္။ အဲ႕ဒီေတာ့ “ ဘယ္ Zone ေတြဟာ အျခားဟာေတြ ထက္ ပိုၿပီး strong
ျဖစ္တယ္ဆိုတာကို ဘယ္လို သတ္မွတ္မလဲ “ ဆိုတဲ႕ ေမးခြန္းရဲ႕ အေျဖကို
ကၽြန္ေတာ္တို႕ လိုအပ္လာတာပဲ ျဖစ္ပါတယ္။
အေျဖကေတာ့ ဘယ္ေနရာမွာ Zone ဟာ trend ကို ဆက္သြယ္ဆက္ဆံပါသလဲ ဆိုတာပါပဲ။
Chart 3 ကို ၾကည့္ပါ။
ဒီ Demand zone ကို EUR/USD daily chart အေပၚမွာ စစ္ေဆးထားတာ ျဖစ္ပါတယ္။
အေတာ္မ်ားမ်ားဟာ ေစ်းကြက္ က်ဆင္းလာတဲ႕ အခါမွာ ၀ယ္ဖို႕၊ တက္သြားတဲ႕ အခါမွာ
ေရာင္းဖို႕ အတြက္ သူတို႕ရဲ႕ အစြန္႕လြတ္ႏိုင္ဆံုးေသာ ရင္းႏွီးျမဳပ္နွံဖို႕
အတြက္ ေငြလံုးေငြရင္း ေတာ္ေတာ္မ်ားမ်ား ထားရွိၾကပါတယ္။ Trending movement
တစ္ခု အျဖင့္ length အေနနဲ႕ ျမင့္တက္လာတဲ႕အခါမွာ လူေတြ ပိုမို
ပိုမိုၿပီးေတာ့ တူညီတဲ႕ လားရာေတြကို trading လုပ္ၾကေလ႕ရွိၾကပါတယ္။ ဒါဟာ
demand zone မျဖစ္ေပၚမွီမွာ chart ေပၚမွာ ေနာက္ဆံုး drop တစ္ခုကို
ကၽြန္ေတာ္တို႕ ျမင္ႏိုင္တာကို ၾကည့္ရမွာ ျဖစ္ပါတယ္။ အဲ႕ဒီ drop ျဖစ္တဲ႕
အခ်ိန္မွာ ေထာင္ေပါင္းေသာင္းခ်ီတဲ႕ traders ေတြဟာ က်ဆင္းလာတဲ႕ ေစ်းအေပၚမွာ
ဆက္လက္ က်ဆင္းဖို႕ ေမွ်ာ္လင့္ထားတဲ႕ အတြက္ short ၀ိုင္းလုပ္ေနၾကပါတယ္။
Short ၀ုိင္းလုပ္ေနတဲ႕ နည္းတူ ဒါေတြကို ျပန္၀ယ္ဖို႕လည္း buy order ေတြလည္း
ေစ်းကြက္ထဲမွာ လိုေနျပန္ပါတယ္။ ဒီအတြက္ ေစ်းကြက္ဟာ ႀကီးမားတဲ႕ ေငြပမာဏ
ကိုရယူပါတယ္။ Billions of dollors မဟုတ္ရင္ေတာင္မွ ျဖစ္ႏိုင္တာကေတာ့
ရာေပါင္းမ်ားစြာေပါ့။
Market ဟာ ေနာက္ဆံုးမွာေတာ့ ပိုမိုနိမ္ကက်
ဆင္းလာေနတာေတြဟာ ရပ္တန္႕သြားၿပီး ျပန္လည္ တိုးတက္ျမင့္မားလာ ဖို႕
စတင္လာပါတယ္။ Chart 3 ပံုမွာ demand zone ကို marked လုပ္ၿပီး creating
လုပ္ပါတယ္။ ဒီ zone မွာေတာ့ အလြန္ ျမင့္မားတဲ႕ successful trade တစ္ခု
အျဖစ္ ကၽြန္ေတာ္တို႕ကို ေပးႏိုင္စြမ္း ျမင့္မားတဲ႕ ျဖစ္ႏိုင္စြမ္း
ရွိေနပါတယ္။ strong move away တစ္ခု ရွိလို႕ မဟုတ္ပါဘူး။ ဒါေပမယ့္
ကၽြန္ေတာ္တို႕ သိသြားလုိက္တာက ဒီ zone creating ျဖစ္တဲ႕ အခ်ိန္မွာ ဘယ္သူဟာ
ေစ်းကြက္ထဲကို ေငြမ်ားမ်ား နဲ႕ ရင္းႏွီးျမဳပ္ႏွံဖို႕ ၀ယ္ခ် ဖို႕
စဥ္းစားလိုက္တာလဲ ဆိုတာကိုပါ။
တကယ္လို႕ ေစ်းက်သြားဖို႕ သူတို႕ဟာ
ေမွ်ာ္လင့္ေနမယ္ ဆိုရင္ ေထာင္ေပါင္းမ်ားစြာေသာ traders ဆီက
အေရာင္းေအာ္ဒါေတြ အားလံုးကို ၀ယ္ဖို႕အတြက္ကို ဘာေၾကာင့္ တစ္စံုတစ္ေယာက္ဟာ
ကမ္းလွမ္းလာမွာလဲ ဆိုတာကိုပါပဲ။
အျခား ဥပမာအေနနဲ႕ျပပါဦးမည္။ chart 4 ကို ၾကည့္ပါ။
EUR/USD 1 hour chart ကို ရယူထားပါတယ္။
အထက္မွာ ေဖၚျပခဲတဲ႕ ဥပမာ အရ Timeframe ေျပာင္းလဲမႈ အခ်ိဳ႕ဟာ ကၽြန္ေတာ္တို႕
ယခင္က ၾကည့္ရႈ႕ခဲ႕တဲ႕ အရာေတြအတိုင္း အလြန္ဆင္တူပါတယ္။ ပထမ အေနနဲ႕
ကၽြန္ေတာ္တို႕ မွာ chart အေပၚမွာ တစ္ခါၾကည့္ရံုနဲ႕ လူအမ်ား အလြယ္တကူ
ျမင္ေတြနိုင္တဲ႕ အေရးပါေသာ downtrend တစ္ခု ရွိေနပါတယ္။ ၿပီးေတာ့
ကၽြန္ေတာ္တို႕မွာ Strong ျဖစ္ေသာ အနီးကပ္ဆံုး vertical move up တစ္ခု
ရွိေနပါတယ္။ ဒီ move up ဟာ ကၽြန္ေတာ္တို႕ကို ဘာကိုေျပာေနသလဲ ဆိုေတာ့
လူအခ်ိဳ႕ဟာ ေစ်းကြက္ထဲကို ၀င္လာၿပီးေတာ့ downtrend အျဖစ္ကို
ေရာင္းသြားေနတဲ႕ traders ေတြ အားလံုးရဲ႕ အေရာင္းေအာ္ဒါေတြကို
၀ယ္တင္လိုက္တာပဲ ျဖစ္ပါတယ္။
ထပ္ၿပီးေတာ့ အကယ္၍ သူတို႕ဟာ downtrend ကို
ဆက္သြားအံုးမယ္လို႕ ေမွ်ာ္လင့္ ေနတယ္ဆိုရင္ တစ္စံုတစ္ေယာက္ဟာ ေစ်းကြက္ထဲကို
ဘာေၾကာင့္၀င္လာၿပီး အေရာင္းဘက္ကို သြားေနတဲ႕ traders ေတြအားလံုး ဆီကမွ
၀ယ္ရတာလဲ။
Highest probability of working out successfully ရွိတဲ႕
Supply and demand zones ဟာ trend reversals မွာ
ရွာေဖြေတြ႕ရွိေလ႕ရွိတက္ပါတယ္။ ေတြ႕လည္းေတြ႕ပါတယ္။ long duration of time
တစ္ခုအတြက္ က်ဆင္းသြားၿပီးခဲ့တဲ႕ market ျဖစ္ေပၚၿပီးေနာက္ ဖန္တီးခဲ႕တဲ႕
Demand zone တစ္ခုမွာ Down move ရဲ႕ အစမွာ ျဖစ္ေပၚလာတဲ႕ demand zone ထက္ကို
working out profitably chance ဟာ အခြင့္အေရး ပိုမိုမ်ားျပားစြာ ရွိေနတယ္
ဆိုတာပဲ ျဖစ္ပါတယ္။ ဆန္႕က်င္ဘက္အားျဖင့္လည္း ဒါဟာ supply zones
ေတြအတြက္လည္း တူတူပဲ ျဖစ္ပါတယ္။ အခ်ိန္ၾကာျမင့္စြာ တက္ေနတဲ႕ market အေနအထား
တစ္ခုမွာ၊ အထက္ကို တက္ေနတဲ႕ သက္တမ္း အထဲမွာ ေနာက္က်စြာ ျဖစ္ေပၚလာတဲ႕
supply zone တစ္ခုဟာ bottom of the move up တစ္ခုမွာ created လုပ္လာတဲ႕
zone ထက္ကို ေအာင္ျမင္တဲ႕ trade တစ္ခု အတြက္ ရရွိလာတဲ႕ ပိုမို
ေ၀းကြာေကာင္းမြန္တဲ႕ အခြင့္အလမ္း တစ္ခု ရွိပါတယ္။
Time Taken To Return To The Zone
Zone ကို ျပန္လာဖို႕ အခ်ိန္ယူျခင္း
ဒီေနရာမွာ trading institutions ကုန္သြယ္ အဖြဲ႕အစည္းမ်ား
ပါ၀င္ေဆာင္ရႊက္ေနတဲ႕ အမ်ိဳးအစား ႏွစ္မ်ိဳး ရွိတယ္လို႕ ဆိုပါတယ္။ ပထမ အေနနဲ႕
intra-day trading အေၾကာင္းေျပာပါမယ္။ ဒီျဖစ္စဥ္မွာ ကၽြန္ေတာ္တို႕
ေစ်းကြက္ အလႈပ္ နည္းနည္းမွာ အျမန္နည္းနည္းယူတဲ႕ နည္းစနစ္ကို သံုးပါတယ္။
ဒီ့အတြက္ ရည္ရြယ္တာလည္း ျဖစ္ပါတယ္။ Intra-day trade တဲ႕ Bank traders ေတြဟာ
သူတို႕ရဲ႕ trades ေတြကို အဲ႕ဒီေန႕ အတြင္းသာလွ်င္ ထားခ်င္ေနၾကတာ ျဖစ္ပါတယ္။
သူတို႕ မဟုတ္တဲ႕သူေတြကေတာ့ သူတို႕ရဲ႕ positions ေတြကို ညလြန္သြားတဲ႕ အထိ
ကိုင္ထားတက္ ပါလိမ့္မယ္။ ဒီအဓိပၸါယ္ကေတာ့ market makers ေတြဟာ အဲ႕ဒီ
intra-day traders ေတြ ေရာင္းခ်င္ ၀ယ္ခ်င္တဲ႕ အခ်ိန္ေတြမွာ သူတို႕ရဲ႕ trade
ေတြကို ထားဖို႕ ရွိေနတဲ႕ သေဘာပဲ ျဖစ္ပါတယ္။ အဲ႕ဒီေနရာေတြ ရဲ႕ အမ်ားစုကေတာ့
supply and demand zones မ်ားပဲ ျဖစ္ပါတယ္။
ဒါ့ေၾကာင့္ အဲ႕ဒီ
intra-day traders ဟာ trades ေတြကို ညသိပ္ မကိုင္ထားဘူး ဆိုတာကို
ကၽြန္ေတာ္တို႕ဟာ သိခဲ႕လို႕ရွိရင္ ဒါဟာ ဘာနဲ႕တူသလဲ ဆိုေတာ့ အကယ္၍ 24 Hour
time frame တစ္ခု အတြင္း ဒီ zones ေတြကို market ဟာ ျပန္လွည့္မလာဘူး ဆိုရင္
ဒီ zone ေတြဟာ lower probability of working out ျဖစ္သြားတဲ႕ဘက္ကို ပိုမို
ဦးတည္သြားၿပီး ျဖစ္ပါတယ္။ ဒါေၾကာင့္မို႕ ကၽြန္ေတာ္တို႕အေနနဲ႕ 24 hours
အတြင္း ျပန္လာရန္ ထိန္းခ်ဳပ္ႏိုင္တဲ႕ market trade zones ကိုသာလွ်င္ Trade
သင့္ပါတယ္။ ဒါကေတာ့ တနာရီ chart မွာ အဓိကအားျဖင့္ trade တဲ႕ supply and
demand traders အတြက္ စည္းမ်ဥ္း တစ္ခုပဲ ျဖစ္ပါတယ္။
24 နာရီ အတြင္း
chart ေပၚမွာ ကၽြန္ေတာ္တို႕ သတ္မွတ္ထားတဲ႕ Supply or demand zone သို႕
ျပန္လွည့္လာဖို႕ ပ်က္ကြက္ခဲ႕တယ္ဆိုရင္ zone ဟာ သက္တမ္းလြန္သြားၿပီးလို႕
သတ္မွတ္ရပါမယ္။ ကၽြန္ေတာ္တို႕အေနနဲ႕ ဒါကိုထပ္ၿပီး trade မလုပ္ရန္ပဲ
ျဖစ္ပါတယ္။ သူ႕နဲ႕ ဘယ္လိုမွ ထူးျခားသက္ဆိုင္မႈ မရွိေတာ့ဟု သတ္မွတ္ရပါမယ္။
ကၽြန္ေတာ္အေနနဲ႕ ဒီအေပၚမွာ lots ေတာ္ေတာ္မ်ားမ်ား စမ္းသပ္ခဲ႕ၿပီးပါၿပီး။
24 hours အျမင့္ဆံုးပါပဲ ။ အကယ္၍မ်ား ဒီထက္ေက်ာ္လြန္သြားခဲ႕တယ္ ဆိုရင္ေတာ့
zone ရဲ႕ ျဖစ္ႏိုင္စြမ္း ဟာ သိသိသာသာ ေလ်ာ့က်သြားမွာ ျဖစ္ပါတယ္။
အကယ္၍
ကၽြန္ေတာ္တို႕ဟာ ကၽြန္ေတာ္တို႕ရဲ႕ daily chart အေပၚမွာ ရွိေနတဲ႕ supply
and demand zones မွာ trade ဖို႕ ဖန္တီးေနတယ္ဆိုရင္ market ဟာ တစ္လ
အတြင္းမွာ Zone ကို ျပန္လာခဲ႕ရမွာ ျဖစ္ပါတယ္။ အကယ္၍ လရဲ႕ အကုန္မတိုင္ခင္
ျပန္မလာခဲ႕ဘူးဆိုရင္ ဒီ level ဟာလည္း သက္တမ္းကုန္ဆံုးၿပီးလို႕ ယူဆရပါမယ္။
ၿပီးေတာ့ ကၽြန္ေတာ္တို႕ market ဟာ ျပန္လွည့္ခဲလ်ွင္ လည္း trade ဖို႕
မက်ိဳးစားရေတာ့ေပ။ ဒါဟာ ဒုတိယ အမ်ိဳးအစား ျဖစ္တဲ႕
ဘဏ္္မ်ားပါ၀င္ေဆာက္ရြက္ေနတဲ႕ long term position trading ပါ။
Forex
market အားလံုးထဲမွာ အလုပ္လုပ္ေနၾကတဲ႕ large institutions ေတြဟာ အတူတကြ
ပူးေပါင္းေဆာင္ရြက္ၾကပါတယ္။ ေစ်းကြက္ကို ရယူဖို႕နဲ႕ ၿပီးေတာ့ ေစ်းႏံႈးကို
လွည့္ျဖားကစားဖို႕ သူတို႕ အစီအစဥ္ ခ်ထားတဲ႕ လားရာအတိုင္း သြားဖို႕ကို
ပူးေပါင္းေဆာင္ရြက္ၾကတာပါ။ သူတို႕ရဲ႕ Trades ေတြထားၿပီး သြားေစခ်င္တဲ႕
နည္းလမ္း ကို လူတိုင္း ဆန္႕က်င္ဘက္ ကိုသြားေနတယ္လို႕ ထင္ေအာင္ လုပ္တာလို႕
ဆိုပါတယ္။
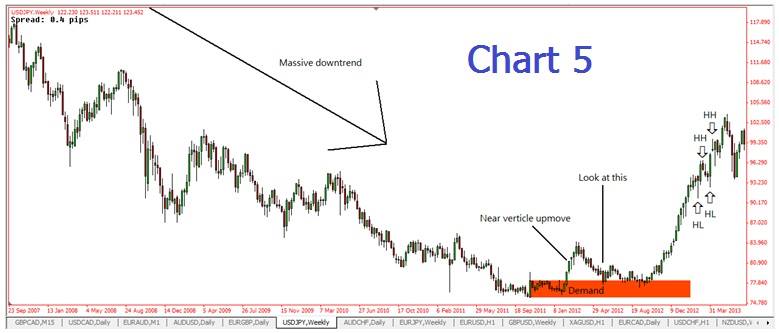
Chart 5 ကိုၾကည့္ပါ။
သည္မွာေတာ့ ကၽြန္ေတာ္ေတြ႕ရွိထားတဲ႕ USD/JPY ေပၚက ဥပမာတစ္ခုပါ။
ပထမဦးစြာ သတိထားရမွာက လြန္ခဲ႕ေသာ သံုးႏွစ္နီးပါးက ေနထား ထားတဲ႕ point
အားျဖင့္ အေရးပါတဲ႕ downtrend တစ္ခု ဘယ္လို ျဖစ္ေပၚလာသလဲ။
အဲ႕ဒီအခ်က္ေၾကာင့္ ေစ်းကြက္ဟာ အခ်ိန္ၾကာၾကာ ဆင္းသြားခဲ႕ၿပီးၿပီး ျဖစ္ပါတယ္။
ဒီအဓိပၸါယ္ကေတာ့ market ထဲမွာ ရွိေနတဲ႕ trader အမ်ားစုဟာ short
လုပ္ေနၾကေနတယ္ ဆိုတာပါပဲ။
ထို႕ေနာက္ တစ္ေနရာမွာ ကၽြန္ေတာ္တို႕ ရုတ္တရတ္
အထက္ကို တက္သြားတာကို သိလိုက္တယ္။ ဒါဟာ အေရးပါပါတယ္။ ဘာေၾကာင့္လဲ ဆိုေတာ့
ဒီ downtrend ဟာ ဘယ္ေလာက္ၾကာၾကာ ျဖစ္ေပၚၿပီးခဲ႕သလဲ ဆိုတာပါပဲ ။
လူေတြအေတာ္မ်ားမ်ား ဟာ ဒီ downtrend မွာ USD/JPY မွာ အေရာင္းေအာ္ဒါေတြ
ဖြင့္ေနၾကလို႕ပါပဲ။ ေစ်းကြက္မွာ ရုတ္တရတ္ အထက္ကို တက္သြားတဲ႕ အဓိပၸါယ္ကေတာ့
ဘဏ္ေတြဟာ ေစ်းကြက္ထဲကို ၀င္လာပါတယ္။ ၿပီးေတာ့ အေရာင္းေအာ္ဒါေတြ ဖြင့္ေနတဲ႕
traders ေတြအားလံုး ကို ႀကီးမားတဲ႕ အ၀ယ္ဘက္ကေနၿပီးေတာ့
ခ်ိဳးျဖတ္လိုက္တာပဲျဖစ္ပါတယ္။
ဘဏ္ေတြဟာ ဘယ္ေလာက္လိမ္မာ
ပါးနပ္သလဲဆိုရင္ အေတာ္အသင့္ တက္သြားၿပီးတဲ႕ ေနာက္မွာ သူတို႕ဟာ ေစ်းႏံႈးကို
ျပန္လည္ က်ဆင္းေစပါတယ္။ ဒါဟာ ဘာျဖစ္ေစသလဲ ဆိုေတာ့ လူတိုင္းလူတိုင္းဟာ
downtrend ဟာ ဆက္ၿပီးသြားလိမ့္မယ္လို႕ ထင္ပါတယ္။ ဒါေၾကာင့္မို႕ သူတို႕ဟာ
ထပ္ေရာင္းဖို႕ စၾကျပန္ပါတယ္။ market ဟာ မူလ banks ေတြ၀ယ္တဲ႕ ေနရာကို
ျပန္လွည့္လာေသာအခါ သူတို႕ဟာ ထပ္ၿပီး ၀ယ္ျပန္ပါတယ္။ ဒုတိယ အႀကိမ္ ၀ယ္ျခင္းဟာ
အေရးပါတဲ႕ ျမင့္မားမႈေၾကာင့္ ေစ်းကြက္ ရပ္သြားတဲ႕အတြက္ အေရာင္းေအာ္ဒါေတြ
ဖြင့္ခဲ႕တဲ႕ Traders ေတြရဲ႕ losing position ေတြကို trader ေတြကိုယ္တိုင္
ျပန္လည္ စားရင္းဖ်က္သိမ္းလိုက္တဲ႕ lots ေတြနဲ႕ ပူးတြဲ ပါ၀င္လာပါတယ္။ ဒါဟာ
trending ကို ျပန္လည္ စတင္ေစတာလည္း ျဖစ္ပါတယ္။
Large institutions
ေတြဟာ ေစ်းကြက္ထဲမွာ trades ေတြကို ထားတဲ႕ အခါမွာ သူတို႕ဟာ သူတို႕ရဲ႕
trades ေတြအားလံုးကို တူညီတဲ႕ price range ႏွိဳင္းယွဥ္မႈ တစ္ခုမွာ
၀င္လိုၾကပါတယ္။ သူတို႕ဟာ ေနရာ တစ္ခုမွာ trade တစ္ခုကို မထားပါဘူး။ ၿပီးေတာ့
ဒုတိယ တစ္ခုကို မထားမွီမွာ သူတို႕ဟာ ေစ်းကြက္ သူတို႕ရဲ႕ ပထမ trade မွ
အေ၀းသို႕ ေရႊ႕ရွားသြားသည့္တိုင္ေအာင္ ေစာင့္ပါတယ္။ ဒါဟာ ပံုမွာ ျပထားတဲ႕
အတိုင္း daily demand zone ကို ေစ်းကြက္ဟာ ဘာေၾကာင့္ျပန္လာ ရသလဲ ဆိုတဲ႕
အခ်က္ပါပဲ။
Trend Direction
Forex trading strategies
အမ်ားစုနဲ႕ အတူ supply and demand traders ေတြဟာ နည္းပညာအရ
ေပါင္းစပ္ၾကပါတယ္။ trend ရဲ႕ အယူအဆေတြကို သူတို႕ရဲ႕ ေစ်းကြက္
သံုးသပ္ခ်က္ေတြ ျပဳလုပ္တဲ႕ အခါမွာ ျပသနာက traders ေတြဟာ trend ရဲ႕
အယူအဆေတြကို အေကာင္အထည္ေဖာ္ေနတဲ႕ နည္းလမ္းေတြကို အသံုးျပဳေနလို႕ပဲ
ျဖစ္ပါတယ္။
ပံုမွန္အားျဖင့္ daily chart အေပၚမွာ trader တစ္ေယာက္
ဘာလုပ္သြားသလဲ ဆိုတာ လိုက္ပံုေဖာ္ေနတာ ပါ။ daily မွာ trend ဟာ down
ျဖစ္ေနတယ္ ဆိုတာ ျမင္တယ္။ ဒါေၾကာင့္ သူတို႕ဟာ supply zones ေတြမွာသာလွ်င္
trades ေတြကို ရယူဖို႕ သြားဖို႕ စဥ္းစားေနတာ ျဖစ္ပါတယ္။ daily trend ရဲ႕
direction အတိုင္း Trade ဖို႕ သိခဲ႕သလို ျဖစ္ေနပါတယ္။ ဒီလိုျဖစ္ေနရတာဟာ
Trader ဟာ daily chart မွာ trades ေတြ ရယူထြက္တာဟာ ကာလအေတာ္ ၾကရွည္စြာ
ဘယ္ေတာ့မွ မမွားတဲ႕ အယူအဆ ျဖစ္လို႕လည္း ျဖစ္ပါတယ္။ အဲ႕ဒီမွာ ျပသနာ
ကစေတာ့တာပါပဲ။ အကယ္၍ trader ဟာ lower time-timeframe မွာ trades off
လုပ္မယ္ဆိုရင္ ျပသနာက ေပၚေပါက္လာႏိုင္ပါတယ္။ သူတို႕ဟာ အျမဲတမ္း သူတို႕
trades off လုပ္တဲ႕ time frame ေပၚက trend ဟာ daily time frame ေပၚက trend
နဲ႕ ေျပာင္းျပန္ျဖစ္ေနတယ္ ဆိုရင္ လက္ရွိ Timeframe ေပၚက trend ကို
ဆန္႕က်င္ၿပီးေတာ့ trading လုပ္ေနၾကမွာ ျဖစ္ပါတယ္။ ဥပမာအားျဖင့္ trader ဟာ 1
hour chart မွာ trades off ယူမယ္ဆိုရင္ သူတို႕ဟာ multiple trades ေတြ
အေပၚမွာ မလိုအပ္ပဲ အရံႈးေတြဆီကိုသြားေနပါတယ္။ ဘာေၾကာင့္လဲ ဆိုေတာ့ သူတို႕
ဟာ သူတို႕ daily trend ရဲ႕ direction အတိုင္း trading
လုပ္သင့္တယ္လို႕ယံုၾကည္ေနလို႕ ပဲ ျဖစ္ပါတယ္။ Trend ကိုဂရုမစိုက္ပဲ 1 hour
chart ေပၚမွာ Up ပါ။
ကၽြန္ေတာ္တို႕ဟာ trades off ေတြအားလံုး ထားထားတဲ႕
time frame ေပၚက trend ဟာ တစ္ခါပဲ ကၽြန္ေတာ္တို႕ အေနနဲ႕ လိုက္ပါသင့္တယ္
ဆိုတာကို သေဘာမေပါက္ၾကပါဘူး။ အကယ္၍ daily chart မွာ ကၽြန္ေတာ္တို႕ trade
ရင္ daily trend ရဲ႕ direction အတိုင္း trading လုပ္သင့္ၿပီးေတာ့ အကယ္၍ 1
hour chart မွာ trade တယ္ဆိုရင္ 1 Hour trend ရဲ႕ direction အတိုင္း
trading လုပ္သင့္ပါတယ္။
နားပါဦးမယ္
****Nonentity Trader